29 July 2018

Grain Patterns

I finished two new spoons from wild cherry. This is the first one, the shape is based on the pattern created by growth rings on the handle.


This is the second one, placed "upside down" with respect to the center of the growth rings.


And here are all the cherry spoons together. The sapwood sometimes stayed white, sometimes oxidized to reddish color and sometimes it is separated from heartwood with a distinctive white strip.


First and second spoon from the left is a reversed tangential cut, third is a tangential cut and the last is a radial cut. Here is the schema:


8 June 2018

Cherries all around


The last spoon from wild cherry was so nice that I couldn't leave all that remaining wood from the broken cherry tree to rot in the forest. I went there again and split a few more pieces.
So much for my resolution that I won't overfill my freezer with green wood anymore.

First I carved these two cooking spoons (not oiled yet).

Then there's this spoon with a dramatic contrast between heartwood and sapwood.  White sapwood oxidized to orange color, probably because I soaked it repeatedly during sanding.

And finally one more spoon from apple wood.

7 April 2018

Hornbeam and Wild Cherry

I have two new species of wood in my collection. The first is a wild cherry. There are many wild cherries growing in this area and they blossom beautifully every spring together with blackthorn bushes. But many trees are very old and we found one of them uprooted this winter.


The heartwood has a pretty shade of brown, the sapwood was completely white during carving, but later it oxidized to orange hue. The lower picture also shows a white strip that remained between them.

On the other hand, hornbeam wood is very pale, but it has very interesting patterns.


10 March 2018

Elven Spoons

This is a spoon from apple wood that I carved before Christmas. Jarko says it looks elven. I can quite imagine Elves in Rivendell eating with such spoons.


So I made another spoon like that - also from apple wood but this piece has a nice golden color. I tried to carve the same shape.


And here are both spoons. They may look the same at the first sight, until you notice the place where the handle meets the bowl. I carved the notch too deep on the upper spoon and it disrupted the harmony of curves somehow. It does not look ugly but it is different than I wanted it.
So here is the moral: measure twice, cut once! Little details matter.


24 February 2018

Narrow-leafed Ash

I gained some ash wood last year after a windstorm. There were many broken branches from ash trees in the park and one small log ended at my place. This ash tree had different leaves than usual - I learned that it is narrow-leaved ash that usually grows in the south.
An unfinished spoon from this wood has been lying on my table since Christmas and I didn't know what to do with it. But then I found inspiration here.


Ash wood is ring-porous: it has big open pores aligned around the growth rings. I like the pattern that the pores create on the handle, so I decided to highlight it a little. I put some cinnamon on the handle, let the grains sink into the pores and then I finished it with walnut oil.


I've also carved this little cooking spoon using apple wood from the freezer. My freezer still contains five spoon blanks from fruitwood, a small maple log for a shrink cup, a few offcuts from various kinds of wood and one bent willow branch, presumably as a backup. I know, other people store ice-cream and packs of frozen vegetables in their freezers... I definitely think I should free some space in mine and this is the start.

28 January 2018

Cup from Birch Burl

About a year ago I received a piece of birch with a fist-sized burl (or rather two burls, one bigger and one smaller, joined together). I finally took courage to carve something from it during Christmas vacation. I wasn't sure if I would succeed, so I didn't even take pictures during the carving. Now I regret it because it turned out excellent.


First I sawed the burl off the branch. The top layers were soft and porous like normal birch wood, but the material was darker, denser and harder inwards. I wanted to hollow the inside of the cup, but the wood was as hard as nails on that side. So I began with a drill and high speed cutter and then I extended the hole with carving gouges and a spoon knife.


A knife was sufficient for shaping the outside walls but I had to be very careful because the wavy wood tore out easily in some places. The smaller burl was transformed into a tiny handle.


Carving from burls is challenging but the wood pattern is worth it. The light strips occur in the places where the direction of the fibers changes. And they even move slightly before your eyes when you turn the wood under a lamp, which is a truly fascinating sight.

27 November 2017

How to Make a Shepherd's Shrink Cup, Part 6 (Brass Hoop)

Caution! You can easily cut your hands on brass sheets, so it's better to use gloves.
Cut 1cm strip from 0,4mm thick brass sheet. You can also use copper sheets instead of brass. I've also seen one shepherd's cup with a grey metal hoop (maybe iron or pewter). The brass hoop can be decorated with engraved patterns but that's another craft altogether, so you may just leave it as it is.
The ends of the hoop may be fastened with rivets and hidden inside the handle. Sometimes they are fixed to the handle with small brass or iron nails. And sometimes there are more nails fixing the hoop to the cup itself. If you are afraid that the nails may cause the cup to crack, you can fix the hoop without nails like this:


If you want to use rivets, wind the brass strip tightly around the cup and through the hole in the handle. Cut it so that the ends overlap about 0,5 cm. Mark the overlapping parts with a thin marker. If the brass strip is too hard and it cannot be tightened around the cup properly, then subtract about 1mm from the measured length. Then drill the holes. I found that mechanical hand drill works best for this.


Fit the rivets into the holes and cut them so that about 1mm is sticking out. Put the hoop on a metal surface and peen the rivets gently.

Hide the rivets inside the handle and slip the hoop on the cup.


Instead of a metal hoop, you can also use wooden hoop. You can easily create one from a hazel sunshoot if you split it and carve it from both sides until just a thin slice remains (some basket makers have a special tool for it). Then 
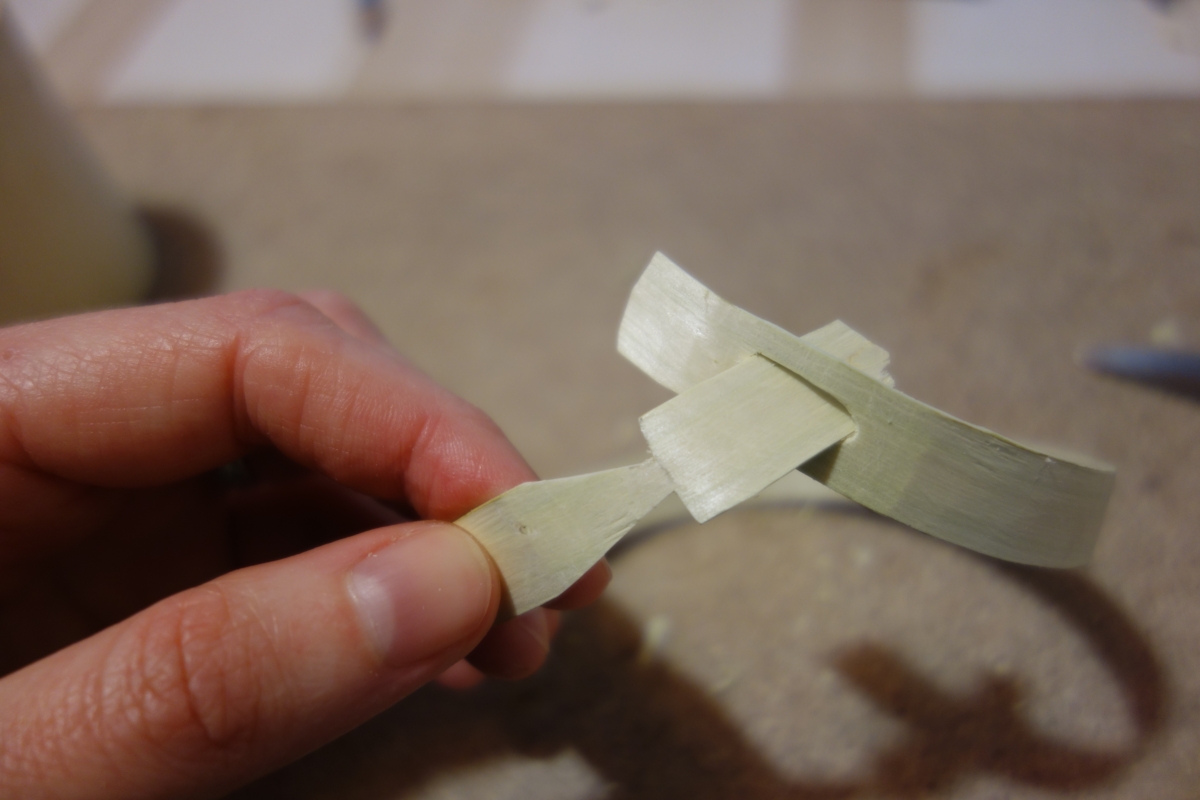
flex the hoop carefully around the cup. Carve an oblong hole on one end like this: 


Then wrap the hoop around the cup (with the handle in place) and mark a line on the opposite end. Add two skew lines and cut off the resulting triangles on both sides. Then taper both ends as thin as you can.


Feed the end of the hoop into the hole and put the finished wooden band onto the cup. If it is too small, adjust the hole a little. When the hoop dries, it contracts a bit, so it should hold tightly. It can also be fixed with a tiny wooden peg. You can prepare more hoops in advance and boil them before using.


Finally you can decorate the cup itself. It is common to carve the lower rim and sometimes also a decorative strip below the upper rim. I would leave the rim itself undecorated because it's more comfortable for drinking that way.


That's all for now. It is not more difficult than other carving projects, it just takes an awful lot of time. If you decide to try it, let me know how it turned out!